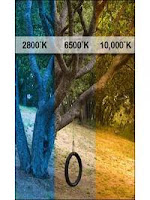
When you look at a blank white sheet of paper, you are always gonna see the same thing whether you’re indoors in a room lit by tungsten or florescent light, candle lights, outdoors in midday sun, on an overcast day or even in a darkroom full of shadows. You are always going to see the exact same thing, and you are always going to identify that piece of paper as white in every situation. That is because of the great flexibility of the human visual system and its capability to adapt to changing lighting conditions smoothly and quickly.
Your camera on the other hand does not have this capability. A blank piece of paper can look orange under candle light or tungsten light. It can look blue in midday sun. and it can look green under florescent light.
The way to make your camera see white as it really is, is by choosing the appropriate white balance setting in each lighting condition you’re shooting under. White balance is all about color. Each light source has a specific color temperature. Color temperatures are measured on the Kelvin scale.
Some light sources are warmer than others. For example, the sunlight is warmer than a candle light. The warmer the light, the more it has the tendency to look blue or cast a blue tint across a scene.
You can remember this by turning on a lighter. Observe the flame. At the bottom where it is closest to the base it looks white. A little further up the road it looks blue. A little further more towards the upper end it becomes orange. So the warmer the light, the bluer it looks. The cooler the light, the more orange-y it looks.

White balance is how the camera balances these different colors of light sources so that they render properly in the final image. When you’re shooting indoors under tungsten light, the light looks orange so the camera adds a little bit of blue to balance the both out and render the scene correctly. When you’re shooting under midday sun, the scene looks a little blueish, so the camera needs to add a little bit of orange to balance the colors, and again render the scene correctly.
You can set the white balance for your camera either through the menu list or through a dedicated white balance button, if it has one. Once you access the white balance options, you’ll find a number of predefined scenes from which you choose the setting that best suits the lighting conditions you are shooting under. You’ll also find an auto setting, in which the camera will try to make a guess at what the best settings are. Most of the time, those predefined situations are sufficient and will do the job in correctly balancing the colors of your scene.
There is also a custom white balance setting, in which you can specifically define the exact white balance of your scene. This is mostly used in the studio for accurate results.
To set the white balance for your camera manually, you’ll need a grey card
The process is a bit different from one camera manufacturer to the other. Since I’m a Canon user, I’ll explain the process the Canon way. Whether you own a Nikon or a Sony or whatever, the steps should be very very similar.
Now, lets say you’re shooting indoors with a scene lit mainly with a table lamp light. Have your model hold the grey card for you at roughly the same position you will be shooting them, or just place the grey card yourself if there’s no model like when you’re shooting still life.
Now take a shot of the grey card in such a way that it fills the frame. Once you have your shot, access your camera’s white balance menu list, and select the custom white balance option. The camera is gonna ask you to choose the shot that will be its reference. Scroll to the shot you’ve just taken of the grey card and hit ok. Once you’ve done that, the camera will successfully balance the colors of your scene correctly, producing true colors shot after shot until the lighting conditions change.
When your lighting conditions change, or you’ve moved to a different location just take another shot of the grey card under the new conditions like you’ve done the first time. Set the new reference shot, and then start shooting. Your camera’s white balance will adopt the new conditions based on the new custom shot, and will once again balance colors of your scene correctly.
For the most accurate white balance results, always make sure you shoot in Raw file formats. Shooting in Raw will allow you to change and adjust the white balance later in post-production however you choose.
To be honest, I almost exclusively shoot with my white balance set to Auto and if I need to fix anything,I just do that in Adobe Camera Raw once I open my files for editing, and I hardly ever do need to adjust anything.
Related Article : The Art of Manual setting mode in SLR Photography

