


This means that a photographed subject would appear on the sensor at its same actual size in reality. This is called a 1:1 magnification. If the subject appears twice its actual size, it is called a 2:1 magnification ratio. If it appears half its actual size, it is called a 1:2 magnification ratio and so on…

Macro and close up photography involves working with special equipment that give the photographer the chance to move in nice and close to their subject for a magnified view, not possible otherwise due to lens minimum focusing distance restrictions. The further away the lens is from the sensor, the closer you can move it to your subject while still maintaining sharp focus.
Macro photography Equipment
There is a wide range of equipment that you can use if you wanna get into macro photography. Some obviously would cost you a lot but offer you the quality and convenience you need to make macro or close up shots. Others would cost you less money but might not give you such as good results.- A macro lens: this is obviously the way to go if you wanna get into macro photography professionally. It can cost you quit a fortune though, depending on the lens specs you get.
A macro lens is specifically designed to allow you to focus close to your subject without having to physically move in too close, depending on the focal length of the lens.
This is handy because sometimes you want to capture a magnified view of your subject, but you cannot get in too close such as when you are photographing a butterfly let’s say, or else its probably gonna fly away. So if you had a 200mm macro lens, you would be able to back off a little and capture the butterfly from a distance. If you had a 100mm macro lens, you still would be able to capture the butterfly from a distance but you’d have to move in a littler close than you would with a 200mm lens, and so on…
Macro lenses are a beautiful, high quality, and convenient way to capture macro shots, but for some might not be an option due to their prices which could go well above the price of their camera body itself. So if you’re still not sure if you wanna get into macro photography professionally, there are a few other less costly options.

- Close up lens filters: a close up filter is the simplest, cheapest way to go to be able to focus closer to your subject. It’s a special filter that screws in to the end of your regular (non-macro) lens.
Close up filters have ranging powers allowing you to get in close to varying extents. A number 4 filter allows you to get in closer than a number 2 filter does. A number 2 filter allows you to get in closer than a number 1 filter. So the higher the number, the more power a filter has to getting you closer to your subject while still maintaining focus.
You can also screw multiple close up lens filters to get you even closer to your subject. So if you screw a number 4 and a number 2 close up filters, you’ll end up with a number 6 filter that would allow you to move in even closer.
There is one thing you need to keep in mind though. In macro photography the closer you go in, the shallower your depth of field is going to be. So you might not want to go in too close, otherwise you wouldn’t be able to capture a sharp well focused photo of your subject.
- Extension tubes: extension tubes are just hollow tubes that come in different sizes and can be stacked on top of each other. Their job is to move your regular lens further away from the sensor, so you can focus in closer to a subject. You can use them alone, or stack them on top of each other for greater close ups. You would mount your lens on one end of the extension tube, and mount the other end of the extension tube onto your camera body just like you would a lens, and this way you would have pulled your lens further away from your sensor. (related article Photographing Flowers using Extension Tubes).
Extension tubes are a low cost, effective way to go for macro photography. However, you would lose the ability to auto-focus with you lens and instead would have to focus manually. You could get more expensive ones that would give you the chance to still use auto-focusing, but you really don’t need to do that since macro photography would need you to focus manually on your subject for best results anyway


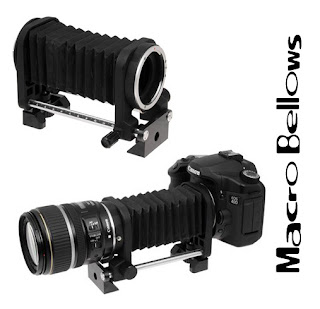
- Macro bellows: macro bellows work in the same way extension tubes do. They have an accordion-like body that allows for controllable extents of furthering the lens away from the sensor and in turn allowing you to move in closer to your subject. You simply open-up the below as much as you need to, and then lock that length up using a fastening lock that would ensure its stays in place.Macro bellows widely range in prices with the more expensive ones providing great ease of use, and allowing for very fine adjustments for precise focusing.
- Reversing rings: one thing you might not know is that if you flip your lens around, you would be able to focus much closer. If you flip your lens around having the front of the lens facing the camera body instead of the back though, you wouldn’t be able to just mount it on the camera body just like that, so you’re going to need a reversing ring. A reversing ring screws onto the front of your lens just like a normal lens filter would, and from the other end it would be mounted onto your camera body. You would have to focus manually by turning the focus ring on your lens of course, or you actually would be moving the camera body itself backwards and forwards which is quite a common method in macro photography. Reversing rings are probably the cheapest way to go for macro and close up photography. Even cheaper than close up lens filters.

Lighting in Macro photography
The closer you get to your subject, the dimmer the situation is going to be. So you would need an effective way to evenly light your subject, and this is where macro ring flashes come into play.
A macro ring flash is a circular flash with one end going into your camera’s hotshoe mount just as a regular flash gun would and it’s going to meter just as usual, and the other (circular) end fits into the front of your macro lens. This way, the flash is gonna fire from all around the lens which would softly and evenly light up your subject all around. Those little things come with their own price though, so you do need to keep that in mind. But if you really want to get into macro photography professionally, they are one essential asset I’m afraid.

Taking macro photos
Like I’ve mentioned earlier, while getting closer and closer to your subject you start to push one of the depth of field rules to its limits. That rule is: the closer you are to your subject, the shallower your depth of field is going to be. This way you’re going to have a very small part of your subject in focus, so you will need to go with larger apertures (narrower lens openings).
Now since you’re gonna be shooting with extremely large aperture values, your shutter speed is gonna need to be slowed down a great deal to maintain correct exposure even in broad day light, so what you need is to have a tripod that you can mount your camera on to prevent camera shake (Read Article about Reduce camera shake with hand-held shots), especially that the slightest shake would be immensely magnified at very short focusing distances.
You probably should also use a camera remote control to prevent shake when pressing down the shutter release button once taking a shot, or alternatively use your camera’s self-timer so you wouldn’t have to touch the camera at the time of firing.
Related Article Tips for Macro Photography With A Magnifying Glass - Reversing rings: one thing you might not know is that if you flip your lens around, you would be able to focus much closer. If you flip your lens around having the front of the lens facing the camera body instead of the back though, you wouldn’t be able to just mount it on the camera body just like that, so you’re going to need a reversing ring. A reversing ring screws onto the front of your lens just like a normal lens filter would, and from the other end it would be mounted onto your camera body. You would have to focus manually by turning the focus ring on your lens of course, or you actually would be moving the camera body itself backwards and forwards which is quite a common method in macro photography. Reversing rings are probably the cheapest way to go for macro and close up photography. Even cheaper than close up lens filters.


