


Camera lens filters can serve different purposes in digital photography. They can be indispensable for capturing scenery in extremely difficult lighting conditions, they can enhance colors and reduce reflections or can simply protect lenses.
Camera lens filters are widely used in photography and cinematography and while some only use filters in rare situations, others rely on filters for their everyday work. For example, landscape photographers heavily rely on various filters, while street and portrait photographers rarely get to use them. Since digital photography is all about the quality and intensity of light, Camera Lens Filter are often necessary to modify the light before it enters the lens.
Many photographers think that some of the built-in tools in Lightroom and Photoshop can simulate filter behavior, making filters redundant in the digital age. As I will demonstrate below, some filters in fact can never be simulated in software and some actually help in getting even better results during post-processing. In this article, I will talk about the different types of lens camera lens filter available, what they do, when and how to use them.

1) What are filters and why should you use them?
Why do you wear sunglasses? Because along with other benefits, they help you see better in intense of light, protect your eyes from harmful UV rays/wind/dust and reduce glare. Filters also serve a similar purpose – they can help reduce reflections, protect your lenses from potential damage, fully or partially reduce the amount of light that enters the lens and even enhance colors. At the same time, filters can actually hurt photographs if they are not properly used. A good analogy would be wearing sunglasses in a dark room. Therefore, not only do you need to know what filters to use, but you also need to know how to use them and in which situations. There are many different kinds of Camera Lens Filter out there – from cheap UV filters to very expensive filters worth several hundred dollars, which can make the process of choosing the right filter type rather challenging.Let’s go through the different types of filters that are available today.
2) Overview of types of lens filters
Here is a list of typical lens filters you can purchase today, along with descriptions of their purposes:| Lens Filter | Photography Type | Purpose |
|---|---|---|
| UV/Clear/Haze Filter | Any | Protects the front element of a lens from dust, dirt, moisture and potential scratches. High quality UV filters can be permanently mounted on lenses with a minimum impact on image quality. |
| Polarizing Filter | Any | Filters unpolarized light, which dramatically reduces reflections, enhances colors and increases contrast. Can be used for any type of photography. Polarizing filters are typically circular, allowing for easy control of the effect of polarization. |
| Neutral Density (ND) Filter | Landscape, Flash Photography | Reduces the amount of light entering the lens, thus decreasing camera shutter speed. Useful for situations where motion blur needs to be created (rivers, waterfalls, moving people) or large apertures must be used with flash to avoid overexposure. |
| Hard-Edge Graduated Neutral Density (GND) Filter | Landscape Photography | Hard-edge GND filters are primarily used in high contrast situations, where the sky is much brighter than the foreground and the horizon is flat. These filters are always rectangular (giving the ability to move them in all directions) and are typically used with filter holders. |
| Soft-Edge Graduated Neutral Density (GND) Filter | Landscape Photography | Soft-edge GND filters are also used in high contrast situations, but where the horizon is not necessarily flat. The soft edge allows for smoother transitions, making the use of a filter less evident. Soft-edge GND filters are also rectangular and are normally used with filter holders. |
| Reverse Graduated Neutral Density (GND) Filter | Landscape Photography | The reverse GND is a specialized filter used by landscape photographers when shooting against the sun while it is setting close to the horizon. While a regular GND filter gradually transitions from dark to clear towards the center, a reverse GND filter transitions from dark to less dark from the center to the edge. |
| Color/Warming/Cooling Filter | Any | Corrects colors, resulting in a change in camera white balance. Some color filters can subtract colors, blocking one type of color and allowing other colors through. These types of filters were popular for film. They are rarely used in digital photography, since their effects can be easily applied in post-processing. |
| Close-Up Filter | Macro Photography | Also known as “diopter”, a close-up filter allows a lens to focus closer on subjects. These filters are only used for macro photography. |
| Special Effects Filter | Any | There are a few different types of special effects filters. Star filters make bright objects look star-like; softening/diffusion filters create a “dreamy” look used for portraits, multivision filters create multiple copies of a subject; infrared filters block infrared and pass visible light; bokeh filters have a certain shape cut in the middle of the filter that makes bokeh highlights have the same shape, etc. |
3) Types of Lens Filters
Camera Lens Filter come in different shapes and forms, as shown below. The most popular lens filters are circular, screw-on filters. Those mount directly onto the filter thread in front of a lens. They come in different sizes, depending on the lens filter thread. The standard and the most common size of screw-on filters for professional lenses is 77mm.Types of Lens Filters:
- Circular screw-on filters – most common type that mounts directly on the lens filter thread. Examples of circular screw-on filters include UV/Clear/Haze filters, circular polarizers, neutral density and color filters. Circular filters also come in different thicknesses – some are thick that can potentially add vignetting, while others are ultra-thin to diminish vignetting, but make it impossible to put a lens cap.
- Square filters – a popular choice for landscape and other photography. A filter holder directly attaches to the lens filter thread and can hold one or more filters. The most popular sizes are 3×3 and 4×4. Can be stacked together in certain situations, which can negatively impact image quality and add reflections.
- Rectangular filters – another popular choice, primarily among landscape photographers. Mounted just like square filters via a filter holder system. Because it is impractical for graduated neutral density filters to be circular (due to different sizes of high-contrast areas and composition), rectangular filters are the primary choice for landscape photography. Unlike square filters, they have more room to move up and down. The most popular size is 4×6, although larger and smaller filter sizes are also available.
- Drop-in filters – these filters are used inside long telephoto lenses, due to the large size of the front lens element. Only clear and polarizing filters are used for drop-in filters.
4) Lens Filters Explained in Detail
Let me go through each filter type in detail and show the effects they produce in pictures (where applicable). It is often too difficult to understand what each filter does and decide on whether you need it or not, so I hope the below information will make it easier for you to decide whether you want a particular type of filter or not.4.1) UV/Clear/Haze Filter

One thing you have to make sure before you purchase a clear filter, is that you buy high quality glass with special multi-resistant coating (MRC). The worst thing you can do is mount a low quality filter in front of an expensive lens. Not only will it hurt image quality, but it will also add nasty reflections, ghosts and flares to your images. I personally prefer B+W F-Pro MRC filters (they are not cheap), but you can also purchase other great alternatives from Tiffen, Hoya and other manufacturers.
Should you use a clear filter permanently on your lenses? This question brings up heated debates between photographers. Many believe that adding a piece of glass in front of lenses only hurts images and does very little to protect them, while others like me keep them for piece of mind and easier cleaning. Some lenses with threaded front elements like the Nikon 50mm f/1.4G can be painful to clean, so a clear filter would make lens maintenance less cumbersome.
To avoid vignetting and other problems, UV filters should never be stacked with other filters.
4.2) Polarizing Filter

I never leave my home without a polarizing filter. When photographing landscapes, I often use a polarizing filter to spice up the colors, darken the sky and reduce haze. Polarizing filters are a must when photographing waterfalls or other wet scenery with vegetation.
There are a couple of potential issues that you need to understand when using a polarizing filter:
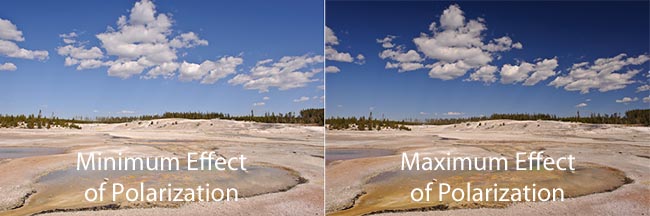
- There is a minimum and a maximum effect of polarization, depending on the filter alignment. You should rotate the filter every time you compose for best results. Take a look at this example of minimum and maximum effect of polarization:
- The effect of polarization changes relative to the sun. The maximum effect of polarization is achieved when the lens is pointed 90 degrees from the sun (in any direction). A simple trick is to form a pistol with your index and thumb fingers, then point your index finger at the sun. Keep pointing at the sun and rotate your hand clockwise and counter-clockwise. The maximum effect of polarization will be where your thumb points in any direction.
- Avoid using a polarizing filter on ultra wide-angle lenses. You might end up with a partially dark sky that will be tough to fix in post-processing. Here is an example of what happens when using a polarizer on a wide-angle lens:
- In some cases the maximum effect of polarization can result in an unnatural-looking dark blue sky as shown below:
- There is a loss of approximately 2 stops of light when using polarizing filters, so you should watch your shutter speed when shooting with a polarizer hand-held. Singh-Ray polarizing filters are better than others in this regard and only lose around 1 stop of light.
- Polarizing filters are typically thicker than regular filters and therefore can result in unwanted vignetting.


4.3) Neutral Density (ND) Filter


Neutral density filters are also useful for flash photography. If you were photographing a model at 1/250 of a second at f/2.8 on a bright sunny day with flash to create a dramatic effect, you would most likely end up with an overexposed subject. You cannot increase the shutter speed because flash sync speed limits you to 1/250 max, so your only option is to stop down the lens aperture to a larger number. Let’s say that number is f/11. But then what if you want to isolate your subject from the background and still have nice bokeh? Without using high speed sync, your only option is to use a neutral density filter to reduce the amount of light that makes it to the camera.
Neutral density filters can be both circular and rectangular. There are no benefits to having a rectangular neutral density filter, so it is best to buy a circular ND filter for size and portability benefits.
It is sometimes necessary to stack neutral density filters to decrease the shutter speed even more. Try not to stack ND filters with wide-angle lenses to avoid vignetting.
4.4) Neutral Density (ND) vs Graduated Neutral Density (GND) Filter

The image above is Lee’s filter holder that can stack up to four filters at a time. I personally use this filter system for my landscape photography work and I take it with me everywhere I go. When using the filter holder on a full-frame body with my Nikon 24-70mm f/2.8G, I try to use focal lengths of 28mm and above to avoid vignetting. If you mount this filter holder on a polarizing filter, you might end up with vignetting even at 35mm and above.
4.5) Hard-Edge Graduated Neutral Density (GND) Filter
 Hard-edge graduated neutral density filters can be very useful in high-contrast situations, where the sky is very bright compared to the foreground and the horizon is flat (due to hard transition from dark to clear). While photographing, the hard edge in the center is aligned with the horizon. The sky is then darkened depending on the intensity of the filter. A two or three stop hard-edge GND filter is often sufficient to balance the shot. Here is a shot taken with a 2 stop hard-edge GND to darken the sky:
Note that the horizon is straight and therefore the filter edge and transition are not visible in the image.
The problem with hard-edge GND filters is that the horizon is rarely flat (especially where I live), so soft-edge GND filters are often more useful. Be careful when stacking hard-edge GND filters in high contrast situations – both filters should be properly aligned to avoid nasty transitions.
4.6) Soft-Edge Graduated Neutral Density (GND) Filter
 Compared to hard-edge GND filters, soft-edge graduated neutral density filters gradually transition from dark to clear, allowing photographers to use these filters when photographing a non-flat horizon. While mountains, hills and other objects above the horizon can be problematic for hard-edge GND filters, soft-edge GND filters work much better in those situations instead, due to the gradual transition. I use soft-edge GND filters for my landscape photography work a lot and find them more useful than hard-edge GND filters.
Stacking soft-edge GND filters is sometimes necessary in high-contrast and other rare situations.
4.7) Reverse Graduated Neutral Density (GND) Filter
 Reverse graduated neutral density filters are relatively new. When compared to regular hard/soft-edge GND filters, they are dark at the horizon (hard-edge) and gradually soften towards the top. Reverse GND filters are very useful for sunset shots when you shoot against the sun and it is near the horizon. A common problem with such sunsets, is that the sun is much brighter than the sky. If you use a hard-edge GND filter, the sky might get too dark and if you use a soft-edge GND filter, the sun will be overexposed. The solution is to use a reverse GND filter, which balances the sun and the sky in the frame, resulting in a more balanced exposure.
Stacking reverse GND filters is sometimes necessary in high-contrast and other rare situations.
4.8) Color/Warming/Cooling Filter
Color / Warming / Cooling filters are generally used to alter camera white balance. There are two types of color filters – color correction and color subtraction. The former is used for correcting white balance, while the latter is used for absorbing one color while letting other colors through. These filters were quite popular for film, but are rarely used for digital photography, since color effects and white balance changes can be easily accomplished in post-processing software like Lightroom and Photoshop. I personally do not use any color filters. Stacking color filters is also acceptable.4.9) Close-Up Filter

4.10) Special Effects Filter
Special effects filters can produce some cool effects, but since most effects can be easily produced in Photoshop, these filters pretty much lost their popularity. Digital photographers rarely carry these filters and I personally do not use them either. The star filter can be easily created in Photoshop through a couple of steps using the “Motion Blur” filter, softening glow can also be easily done through a couple of steps with the “Gaussian Blur” filter and most other filters can also be done in Photoshop. The only filter that cannot be reproduced in Photoshop is a bokeh filter, because the highlights cannot be easily changed through post-processing techniques.Here is a 2 minute “star effect” that I created in Photoshop using very simple technique with the Motion Blur filter:

5) Filter Material – Glass vs Resin Filters
Filters can be made from glass, plastic, resin, polyester and polycarbonate material. Glass filters are typically of highest quality, but are very expensive and tend to easily break, especially of square or rectangular type. Plastic and resin filters are much cheaper than glass and do not easily break – they are the top choice for graduated neutral density filters. Polyester filters are much thinner than glass or resin and are of very high quality, but are prone to scratches and hence not very practical on the field. Polycarbonate filters are very tough, scratch-resistant and are a good alternative to plastic/resin filters.6) Step-Up / Step-Down Rings
Because filters can be expensive, it is much cheaper to buy a single standard filter (for example 77mm) and buy step-up rings for lenses that have smaller filter threads. Step-down rings can cause vignetting and other problems, so always try to use step-up rings instead. You can buy step-up rings for both circular and square filter holder systems in various sizes.related article :Understanding Neutral Density Filters
Article from http://mansurovs.com
By Nasim Mansurov :is a professional photographer based out of Denver, Colorado. He is the author and founder of The Mansurovs, along with a number of other online resources. Read more about Nasim here.


